Unit / Room Library
The Units, Rooms, and Occupancy Locations within your facility must be entered in this library before a resident may be moved-in. The Unit/Room Library is an inventory of the Rooms and Beds that Residents may be moved into.
Accessing the Unit / Room Library
- Select Marketing > Libraries > Unit Room Library from the Main Menu.
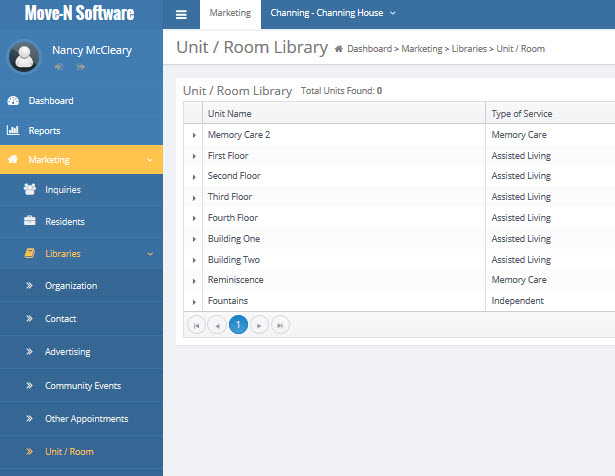
The Unit / Room Library can be sorted Ascending and Descending Alphabetically by clicking the headers Unit Name, Type of Service, or Position.
Units
Unit: The Units can be used to represent sections of your building such as "First Floor", or "AL Wing", or even a sub-section of a floor such as the "Assisted Rooms on the First Floor". Unit locations may be added to the library by clicking the "Add" button in the Unit section of the Unit/Room Library screen and typing the name of the new unit.
Type Service: The Type Service offered in this Unit may be defined by clicking the drop down arrow next to the "Type Svcs" field. This drop down list is defined in the Administrative Tab of the Preferences Library.
Position: The position field defines the order in which the Units appear in the drop down lists, such as when reserving a room or moving in a resident.
NOTE: Even if your community is not divided by units, the name of at least one unit must be entered.
Adding a Unit
- Click the Add New Unit button in the Unit Room Library.

- The New Unit screen will display
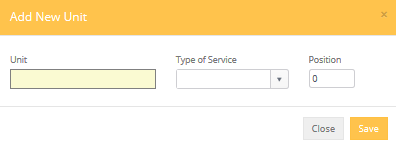
- Enter the Unit Name, Type of Service (If needed), and Position.
- Click Save or Close to cancel.
Edit a Unit
- To edit or change an existing Unit double click the Unit in the list of Units.
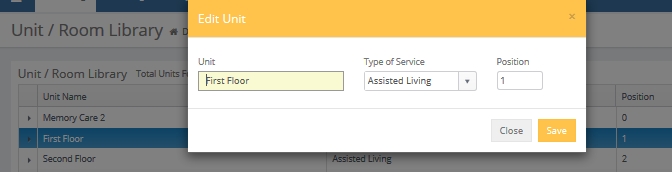
- The Edit Unit box will appear. Make the changes desired to the name, type of service, or position
NOTE: Changing the spelling of the Unit can have unintended consequences to reports, current residents, and historical information. Move-N Software recommends that you contact Technical Support before editing the name of Units and Rooms to discuss the possible ramifications.
Rooms
While Unit names are used to indicate locations of groups of rooms. Each Room number within a specific unit must be unique. Select the "Unit" for which you wish to add rooms.

Display Rooms
Clicking the (arrow) beside the unit name will expand the unit and show the rooms along with the Add New Room button.

The Room section can be sorted Ascending and Descending by clicking the headers Room Number, Room Type or Note.
Add Rooms
- Click the Add New Room button on the room headers. The Add New Room screen will display. Fill out the information and click Save Changes.
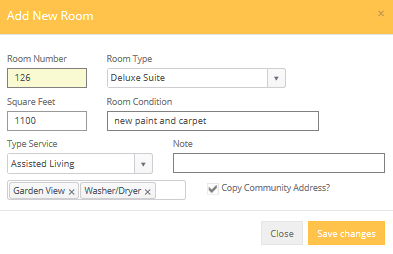
Room Number: Enter a Room number in the "Room Number" field. The library should contain every room in your Center, regardless of whether it is currently occupied or unoccupied.
Room Type: Select the Room Type from the drop-down list (created under Preferences Library). Although the Room Type is optional, more accurate tracking information and reports will be available if this is entered.
Notes: Enter "Notes" which will appear on your Availability and Occupied reports. These notes can be used for any information desired.
Amenities: Amenities can be tracked and are selected from a drop down, which is also created in the Preferences Library. section. A report of Rooms by Amenities may be produced. To delete an amenity click the X beside the name.
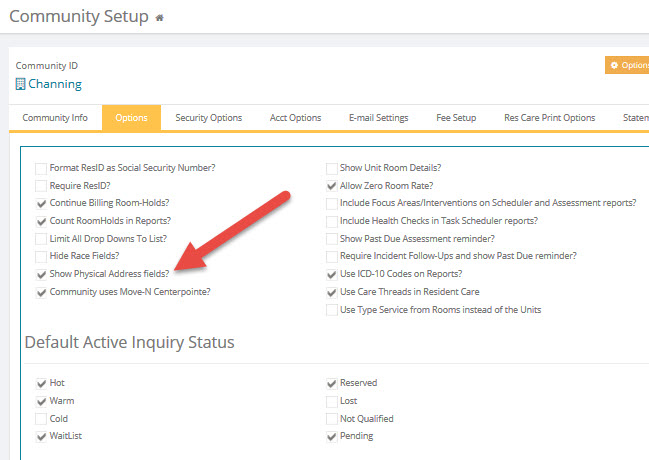
Copy Community Address? Check this box if the "Show Physical Address fields" box under the Options tab of the Community Setup screen is checked. This may be used in situations where the room is a unique physical location, such as a duplex, etc.
Add New Occupant Location:
Immediately after saving the room name the Add New Occupant Location box will display.
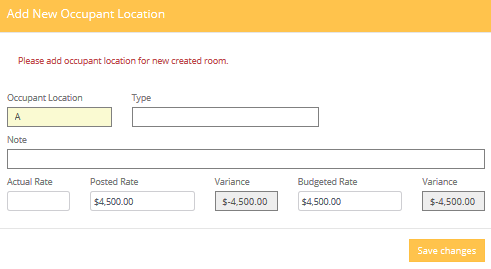
Occupant Location: represents the "space" or "bed" the resident occupies when he or she moves into that room. There must be one Occupancy Location in the library for each resident that will be moved into the building. If, for example, a couple moves into room 101, then there must be a "A" location and a "B" location in the Occupant Location section under room 101.
Actual Rate The Actual Rate should NOT be entered. This field is updated by the program when a resident is moved in. The move in event will provide the user with an opportunity to either move the resident in at the "posted" rate, or override the posted rate and enter a different rate. The actual rate is what will be charged on the resident statements if you are also using the Move-N Accounting program.
Posted and Budgeted: Enter the "Posted" Rate and "Budget" Rate for each Occupant Location. That is the market rate normally charged and any Budgeted rate desired. If there is more than one Occupant in that room, the Rates entered here are for that Occupant only. Note that both Occupant Rate Variance fields (to Posted rate and Budgeted rate) automatically display calculations; data cannot be entered into these two fields.
Click the Save Changes button to save.
Add Additional Occupant Location
When a second or additional Occupancy Location is added for a room, it will be necessary to expand the room after it is created by clicking the (arrow).This will display the button in the Occupant section of the room.

- Click the Add Occupant Location to bring up the Add Occupant Location dialog box.
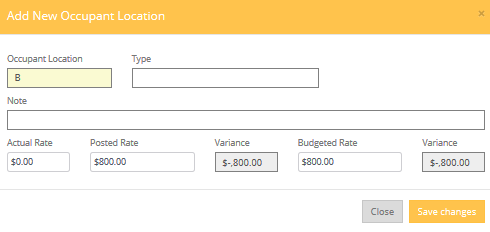
- Type in the B location and click the Save Changes minding the Posted and Budgeted rates if needed for a second occupant.
- Click Save Changes button to return to the Room box.
After adding the B bed to 301 you can now see some additional fields. Most of these fields are populated automatically by various actions performed in the program such as Move-Ins, Move-Outs, Transfers, and or Reservations.

Users should NEVER enter information here unless instructed to do so by Move-N Technical Support.
NOTE: "Reserved" and resident information - including moving a resident into an occupant location and the date it happened -- should NOT be edited here. These fields are provided primarily to reconcile the Unit/Room Library and resident files (if needed).
Moving a resident into the facility should be performed by selecting the Move-In button from the Inquiry screen as described in the Move-in section of this manual. Transferring a resident from one room to another within the facility should be performed by selecting the Transfer/ Update button from the Resident Information screen. Moving a resident out of the facility should be performed by selecting the Move-Out button from the Resident Information screen.
To verify that resident room information is correct, it is suggested that the Daily Census by Location Report (under the Residents button on the Report Selection Screen) be printed and compared with the Occupancy by Unit and Room Report (under Miscellaneous) on a regular basis.
View Unit/Room Status:
There are three reports available here in the Unit / Room Library which provide users the ability to view the current room status. These reports (also available in the Miscellaneous section of the Reports Menu) are accessed by clicking the Print button in the upper right corner of the Unit/Rooms Library screen.
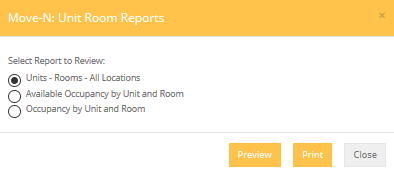
- Clicking the print button will display the Report menu. You can either print or preview the reports from this screen.
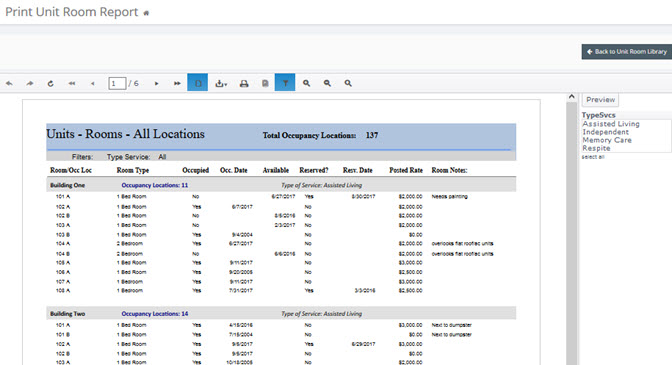
Units - Rooms - All Locations: Prints a list of all rooms, and occupancy locations, grouped by Unit.
Available Occupancy by Unit and Room: Displays available rooms and locations.
Occupancy by Unit and Room: Displays occupied rooms and locations, including resident names and occupancy dates.
* To preview and print a more detailed list of Available rooms, Occupied rooms or All rooms, go to the Main Menu and select Reports. Select the "Miscellaneous" section of the Report Selection Screen, then click on the report name desired. (See the "Reports" chapter of this manual for more details on selecting and printing reports.)