Select Mail Merge Records
* Click the Mail Merge button from the Main Menu Bar. The Mail Merge Selection screen will be displayed.
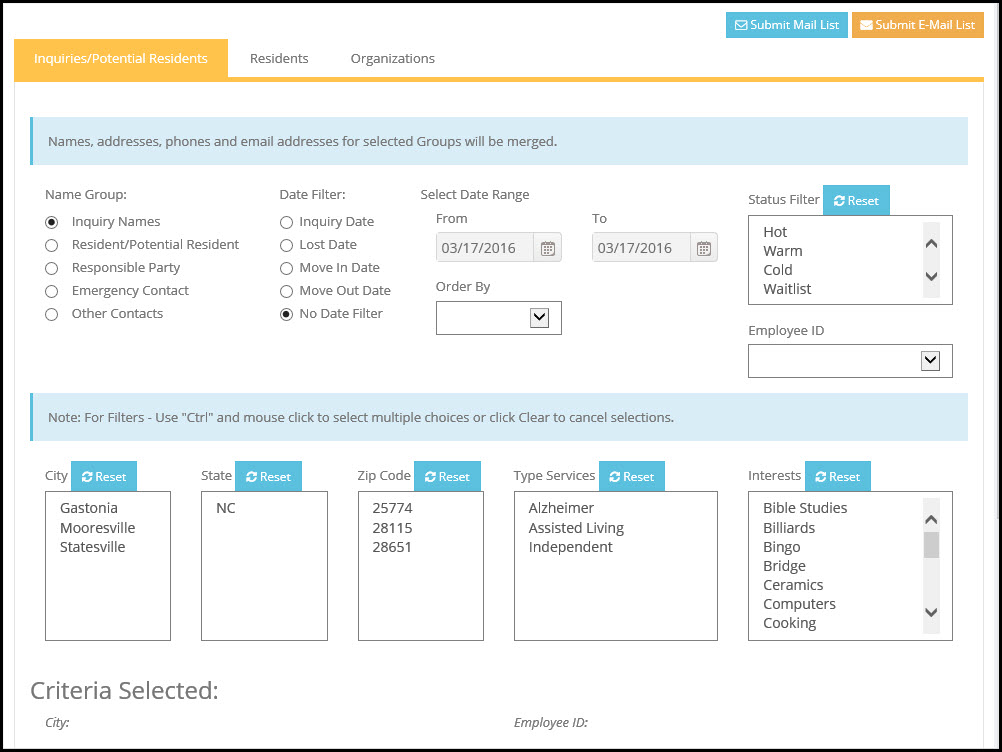
Move-N Mail Merge may be used to print letters or send email to various names, addresses from the Move-N data file. The real power of this feature is that a combination of selection criteria may be used to drill-down to a very detailed level.
NOTE: that when selecting the filter criteria, using the "CTRL" key and mouse click on a list of items will allow you to select multiple choices. So that means that the user could select Hot, Warm AND Cold from the Status selection screen, and get all records marked either Hot, or Warm, or Cold.
The first step is to select either the Residents or Organizations tab. This defines which data table the desired records will come from.
Inquiries/Residents:
In this section names, addresses, phone numbers and e-mail addresses may be pulled from the resident and inquiry tables. Additional selections may be made to filter this export.
Name Group: Allows selection of record type.
* Inquiry - includes records in the Inquiry table. Can be filtered by Inquiry date (see below).
* Resident or Potential Resident - includes either current resident, or residents section of the Inquiry record.
* Responsible Party - from the Contacts tab of the Resident Information screen.
* Emergency Contact - from the Contacts tab of the Resident Information screen.
* Third Party Billing address - from the Contacts tab of the Resident Information screen.
* Secondary Address - from the Contacts tab of the Resident Information screen.
* Date Filter: Allows selecting a date range to determine output of certain resident or inquiry records based on creation date or move out date.
* Inquiry Date - the date an inquiry record was created. This facilitates selecting inquiry records created in a certain time period, such as all new leads generated this year for example.
* Move-in Date - the date a resident was either moved-in or moved-back.
* Move-out Date - the date a resident moved out, or moved out to a room-hold status.
* Lost/NQ Date - the date an inquiry was marked as Lost or not-qualified.
* N/A (no date filter) - grays out the date range field. The export will not be dependent upon any date range. So an export of inquiry records would include all inquiries, regardless of date created.
* Select Date Range: These "From" and "To" date fields are available when a Date Filter has been selected. The dates may be typed into the fields manually, or the calendar icon may be used to easily enter the desired dates. Dates typed in manually must confirm to the MM/DD/YYYY format.
* Order by: Clicking this drop down allows sorting the mail merge list by either Last Name or Zip Code.
* Emp ID: Selecting this drop down allows filtering of the records by the assigned Employee User ID.
* Status Filter: Allows selecting the inquiry status Hot, Warm, Cold, Reserved, etc. Again, any selection combination may be made by using the CTRL-Click feature. Click the Clear button to remove any selections made.
* City: Filter the list by the selected city, or cities if using the CTRL-Click feature
* State: Filter the list by the selected State, or States if using the CTRL-Click feature
* Zip Code: Filter the list by the selected Zip Code, or Codes if using the CTRL-Click feature
* Type Services: Filter the list by the selected Service, or Services if using the CTRL-Click feature
* Interests: This filter may be used as a marketing tool, allowing mail merges to potential records based on "interests". As long as the interests are recorded in the Aids/Ints/Notes tab of the Resident record.
* U/R/O Location - limits mail merge to a specific "unit" in the building, as defined in the Unit/Room Library.
* Add Phone numbers to M-M List - checking this box will include phone numbers on mail merge lists that can be generated.
Organizations:
* Click on the Organizations tab to export names, addresses, phone numbers and e-mail addresses for Organizations and/or Contacts.
* Select Type: Either select Organizations or Contacts to determine which library will be exported.
* Order by: Sort the export by either Contact, Organization or Zip Code.
* Category Filter: Select any specific category, or any combination of categories, such as all records in any Hospital category.
* Priority Filter: The ability to CTRL-Click multiple selections here means that a list of A's and B's may be easily created, rather than being limited to only one Priority selection at a time.
* Add Phone numbers to M-M List - checking this box will include phone numbers on mail merge lists that can be generated.
Once the selection criteria has been established for the specific type of record being merged, click the Submit field in the upper right hand corner of the screen to access the Mail Merge Record Selection screen.
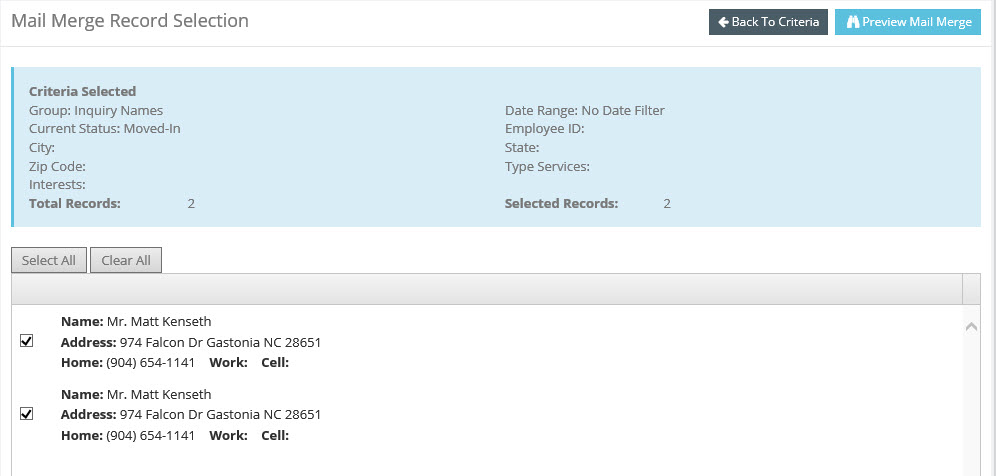
Here, each individual record in the group selected is shown and counted. It is a good idea to proofread your records now, noting any errors or omissions.
* Click the "Select" check box to add or remove records from the list. The box must be checked for the record to be included in the mail merge document to be printed, but provides the opportunity to omit any records from the mailing as desired.
* To quickly select all records, click the Select All button.
* To remove all checks from the selection boxes for the list of names and start over, click the Unselect button.
* Click the Preview Mail Merge button, which accesses the Preview Mail Merge List screen. Use this button if you intend to print mail merge letters.
* Click the Preview Email button, which accesses the Preview Mail Merge List screen. Use this button if you intend to email to your selected recipients.