Create a Rule
The rules for your Templates are going to drive when, why and to whom Template emails will be sent. How you set up these rules will depend on your original marketing strategy. To help with your set up, some examples of rules will be given later in this section and an overview of your options are listed with a short summary of the logic.
From the New Rule Detail Screen, you will carefully set up the criteria for your rule that will be attached to an existing Template that has either been edited for your needs, or you have created from scratch.
Rule Category Options:

Category: Category Trigger
1.Inquiry Status: A.New – Triggers when inquiry is New. A manually entered lead will trigger after the record is Saved. A lead from Centerpointe ( usually status Pending) will trigger when the lead is sent to the CRM.

B.Status Change- Triggers when Status has Changed to a different status. Hot to Cold, etc..

C.Date- Triggers on a specific date. A date and time is set for the trigger. The rule must be set to ACTIVE before the date and time!

2.Inquiry Activity: A. Scheduled – 21 Trigger options: Tour, Assessment, etc. - the marketer has scheduled and saved the activity in the inquiry record.

B. Completed - Triggers when the scheduled Activity is Complete - when the marketer closes the activity in the inquiry record.

3.Current Residents: A. Date: To be sent to Residents on a specific Date with a Current Status.
Can define Contact Type and it will be sent to Resident and the Contact.

4.Previous Residents: A.Date: To be sent Previous Residents on a specific Date with a Current Status.
Can define Contact Type and it will be sent to the Resident and the Contact.

5.Resident Contacts: A. New: Triggered when a new contact is added to a Resident's Contacts and SAVED.

B. Date: To be sent on a specific date to Resident Contacts with a Current Status, Type Service and Contact Type.

6. Organizations: A. Date: To be sent on a specific date to specific Organizations. Can define further with Tags.

7. Contacts - Organizations: A. Date: To be sent to certain contacts within an Organization on a specific date.
Can be further defined with Titles and/or Contact Tags.

How to Create a Rule Examples
There are many types of rule combinations that can be built as part of your Automation Marketing Strategy rules, but three very useful examples are shown in detail in this curriculum. Once you understand the basic logic behind Automation, you can create your own unique Rules.
Example 1: Invitation to an Event with a Date

To set up an email to go out to your lead base on a certain date, see the screenshot below

The above example will be triggered by a Date. The Inquiries emailed will have the Status of Hot, Warm, Cold. The option to select Type of Service is also available to further target your leads.

1.Next, you will decide what Template you will send when the email triggers. The example above is the Grandparent’s Day Event Template –(be sure you select the one you edited for your community) Once the template is selected, the Email Subject is populated from the Templates Email Subject line.
2. Set the Date that you want the email sent. The exact time can be set up as well. NOTE: Time can be used to target times when people are most likely to check their emails.
3. Now, SAVE your Rule!
This will take you back out to the Rule Listing Screen where the new Rule will be seen with the Status of DRAFT.
4. Activate your new rule by clicking the settings icon and click START RULE.

This Example Rule will now generate an invitation to the Grandparents Day Event on June 9, 2021, at 12:30pm to all Inquiries with Hot, Warm, Cold Status!
Second Follow Up Options
With Email blasts for Events, it’s important to send out a reminder the day before. You could even set up a weekly reminder if you are promoting your event several weeks in advance!
Tip: Any follow up to the same Template and audience is best done by + Add New Follow up within the original rule.
As you see in the screen below, an additional follow up has been scheduled for the day before the Event. In this case the same invitation is being resent. To tweak it further, the Event template could be copied and the Email Subject line edited to read that it’s a Reminder.

In this example the first email will go out as the initial invitation and then the day before the event the second email – the copy of the original invitation will go out again.
Create a Rule Detail continued
Example 2 – Setting up a Newsletter Series
Reaching out to your lead database with educational and helpful articles that are relevant to their situation helps develop that sense that your community/company is an expert in the field and that you are very willing to share useful information. A newsletter can be set up monthly or quarterly to go to Inquiries as an example.


The above example is two separate newsletters that are scheduled to go out in June and July. Once you are satisfied with the selection. By clicking the +Add New Follow Up, more newsletters can be added to the series. All follow up must be added at the time of the rule creation and set up or before it becomes ACTIVE.
SAVE RULE!
Then START RULE from the Rule Listing!
Create a Rule Detail continued
Example 3 – Create a Rule Using Inquiry Activity
A Rule triggered by Inquiry Activity opens up a whole field of options for marketing strategy as the list of activities is large. Part of the Marketing Automation strategy is to decide on what activity follow up is best for Automation and what should be kept strictly as personal CRM follow up. Move-N’s goal is to make Marketing Automation as flexible as possible so that it can fit each client’s individual needs.
For the Inquiry Activity Category there are two triggers:
1. Scheduled
2. Completed
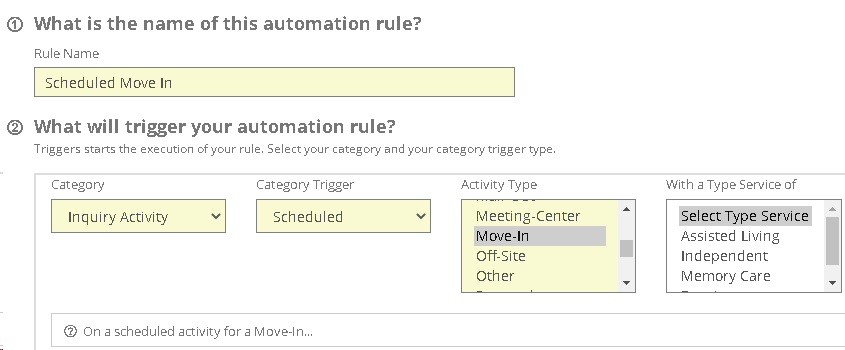
If Scheduled is selected, there are several that will be very useful for Automation: Scheduled Move-IN, Scheduled Tour, and Scheduled Paper Signing are very useful. These will only be sent to inquires that have these activities scheduled in their Inquiry Activity record in the CRM module.

Next, the Template that was created to send to Scheduled Move-Ins will be selected from the Template list. When it should be sent can be selected as well.
The Time that is selected should be considered as it can potentially give Sales the ability to edit a template going out to a particular Scheduled Activity. Time buffers create the sense of a helpful interaction vs. a rushed automation response.

Once finished, SAVE THE RULE!
Your rule is now at DRAFT Status. If any edits to the Template need to be done, do it now and then return to click START RULE. The rule will then be ACTIVE.
Completed Option:
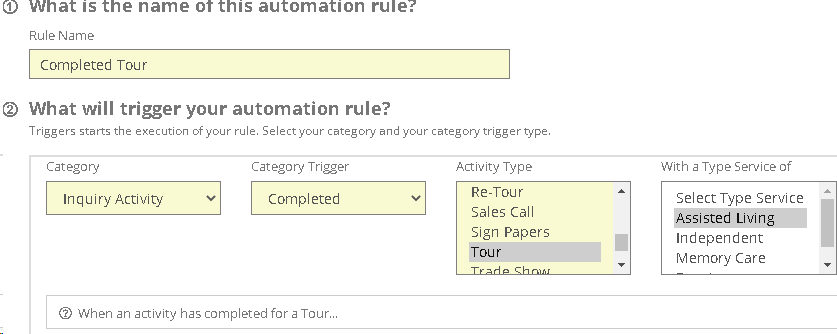
If the Inquiry Activity selected is the Completed option, the Activity entry in the Inquirer’s record must be Closed for MA to Trigger a follow up message. This means that the Sales Team must be prompt in completing their activities/next steps in Move-N.


In the example above, a “Thank you for Touring” follow up is triggered. The option to Send immediately is selected, but selecting Send Later could delay the Thank You note a day later, hours later, etc.
There are many options for Completed Activity. It is the responsibility of the marketing team to carefully consider how often an Activity Type could potentially be sent. In order to keep as many choices available to our clients, Move-N has allowed many Activity Types as options.